1.刚开始是本地测试链接数据库,传递死数据,为了将前后流程走通,也就是给定一个数据
从前台——》到后台——》前台显示;
2.现在我们是实战,直接干;
①本地测试为了方便,页面加载就请求后台数据
请求服务器:.js
 onLoad: function (options) {
      var that = this;//=====注意此处,要用that 指代this=====
      wx.request({
    url: 'http://localhost:8000/wxApp/showMentors', //服务器地址
    method: 'get',// OPTIONS, GET, HEAD, POST, PUT, DELETE, TRACE, CONNECT
    data: {
      },
    header: {// 设置请求的 header
          'content-type': 'application/json'
    },
    success: function (res) {
          console.log(res);
          that.setData({ //======不能直接写this.setDate======
        message: res.data, //在相应的wxml页面显示接收到的数据
      });
    }
  })
},
这里需要注意的是服务器地址URL:即接口:http://localhost:8000/wxApp/showMentors
在浏览器中也可以直接访问:

说明:我是在本地测试+laravel框架,所以我的URL是:本地虚拟域名+路由:http://localhost:8000/wxApp/showMentors
路由:访问方法(laravel的路由)
Route::group(array('prefix'=>'wxApp'),function(){
    Route::get('/showMentors','WxApp\MentorController@showMentors');//老师列表
});
方法:查询所需数据传递到页面(laravel中路由->方法)
public function showMentors(){
    $mentorList = DB::table('mentor_infos_view')
        ->where('if_vip',1)
        ->where('user_id','!=',$this->uid)
        ->get();
    echo json_encode($mentorList);
}
接收:页面接收 .js
success
:
function
(res
)
{
that
.setData
({
//======不能直接写this.setDate======
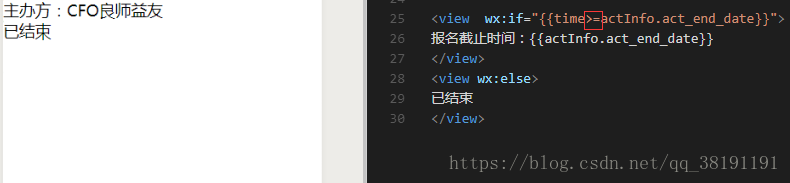
message
: res
.data
,
//在相应的wxml页面显示接收到的数据
});
}
显示: 页面显示.wxml
<!-- 接收数据循环 -->
<
view
wx:for=
"{{message}}"
wx:for-item=
"j"
wx:key=
"id"
name=
"info_border"
>
<!-- 判断是否有头像 -->
<
view
wx:if=
"{{j.mentor_image_uri==null}}"
>
<
image
class=
"widget_arrow"
src=
"http://dev.cfo-mentor.com/menter/public/assets/images/avatar_default.png"
mode=
"aspectFill"
>
</
image
>
</
view
>
<
view
wx:else
>
<
image
class=
"widget_arrow"
src=
"{{j.mentor_image_uri}}"
mode=
"aspectFill"
></
image
>
</
view
>
<!-- 显示 -->
<
view
class=
'info'
>姓名:{{j.mentor_name}}
</
view
>
<
view
class=
'info'
>职位:{{j.career}}
</
view
>
<
view
class=
'info'
>公司:{{j.company_name}}
</
view
>
<
view
class=
'info'
>地区:{{j.address}}
</
view
>
<
view
class=
'info'
>擅长:{{j.mentor_skills}}
</
view
>
<
navigator
url=
'../../pages/info/info?user_id={{j.user_id}}'
>详情
</
navigator
>
<
view
class=
'hr'
></
view
>
</
view
>
效果:

跳转到详情页面:
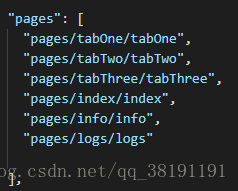
①首先需要创建小程序页面(在app.js中添加 "pages/info/info",)

②再创建连接:在小程序中navigator标签相当于a标签
<
navigator
url=
'../../pages/info/info?user_id={{j.user_id}}'
>详情
</
navigator
>
说明:带参数和以前一样?XX={{XX}},URL就是前面创建的info中的info.js

③在新页面接收数据:
data
:
{
user_id
:
""
},
④在onload中加载请求:
onLoad
:
function
(options
)
{
var that
=
this
;
wx
.request
({
url
:
'http://localhost:8000/wxApp/showMentorInfo'
,
//服务器地址
method
:
'get'
,
data
:
{
user_id
: options
.user_id
,
},
header
:
{
'content-type'
:
'application/json'
},
success
:
function
(res
)
{
that
.setData
({
showMentorInfo
: res
.data
,
});
}
})
},
请求地址: url: 'http://localhost:8000/wxApp/showMentorInfo', //在laravel中就是到路由;
请求方式:method: 'get',
请求参数: data: {
user_id : options.user_id,
},
请求头:header: {
'content-type': 'application/json'},
⑤在laravel中创建路由
Route::group(array('prefix'=>'wxApp'),function(){
    Route::get('/showMentorInfo','WxApp\MentorController@showInfo');//老师个人信息
});
⑥在创建方法
public function showInfo()
{
    $user_id=$_REQUEST['user_id'];
    $showMentorInfo = DB::table('mentor_infos_view')
        ->where('if_vip',1)
        ->where('user_id',$user_id)
        ->first();
    echo json_encode($showMentorInfo);
}
⑦在success里面接收数据
success
:
function
(res
)
{
that
.setData
({
showMentorInfo
: res
.data
,
});
}
⑧在.wxml里面显示数据
<
view
wx:if=
"{{j.mentor_image_uri==null}}"
>
<
image
class=
"widget_arrow"
src=
"http://dev.cfo-mentor.com/menter/public/assets/images/avatar_default.png"
mode=
"aspectFill"
>
</
image
>
</
view
>
<
view
wx:else
>
<
image
class=
"widget_arrow"
src=
"{{j.mentor_image_uri}}"
mode=
"aspectFill"
></
image
>
</
view
>
<
view
class=
'info'
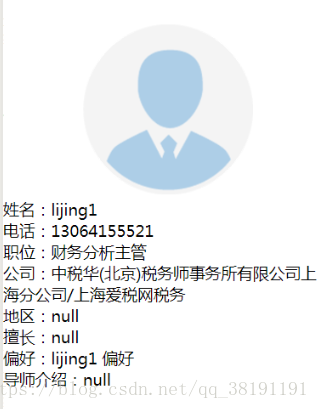
>姓名:{{showMentorInfo.mentor_name}}
</
view
>
<
view
class=
'info'
>电话:{{showMentorInfo.mentor_phone}}
</
view
>
<
view
class=
'info'
>职位:{{showMentorInfo.career}}
</
view
>
<
view
class=
'info'
>公司:{{showMentorInfo.company_name}}
</
view
>
<
view
class=
'info'
>地区:{{showMentorInfo.address}}
</
view
>
<
view
class=
'info'
>擅长:{{showMentorInfo.mentor_skills}}
</
view
>
<
view
class=
'info'
>偏好:{{showMentorInfo.mentor_prefer}}
</
view
>
<
view
class=
'info'
>导师介绍:{{showMentorInfo.mentor_ps}}
</
view
>
<
view
class=
'hr'
></
view
>
效果:
刚入门,如有错误,欢迎指出,感谢!!!